We set up Gauge's business profile in ChatGPT on launch day. ChatGPT gave us some useful pre-written filler, but the onboarding was a bit buggy and incomplete.
In this guide, we'll walk through how to set up your business profile, what you get, all the data you can input, and how to optimize your profile. We'll use screenshots from Gauge's setup to cover domain and identity verification, product feeds, and every field in the built-in Business Agent builder.
OpenAI launched Businesses in ChatGPT in beta on November 10, 2026, so the screens and requirements may change. OpenAI's launch announcement.
What you are setting up
Business Hub is where you manage your business's presence in ChatGPT. The profile explains the business; an eligible business can also add a Business Agent that answers customer questions using its information and guidelines. Product feeds supply catalog details. OpenAI's business overview.
In practical terms, there are several pieces to get right:
| Piece | What you use it for |
|---|---|
| Business profile | Explain what your business does and why a customer should choose it. |
| Product catalog | Supply individual products, their prices, images, and availability. |
| Agent appearance | Set the name, color, tagline, and questions customers see. |
| Agent instructions | Tell the agent how to respond and guide customers. |
| Business information | Give the agent the facts and sources it needs. |
| Insights | Review the engagement information available in your account. |
Claiming does not guarantee better placement or sales. OpenAI continues to make independent recommendations, and Business Agent eligibility is separate from claiming a profile. OpenAI's claiming guidance.
Before you start
Have your website URL and access to its DNS settings ready. In our flow, we also needed a government-issued ID and an additional identity check. Make sure the person completing setup is authorized to represent the business.
You do not need to write every field from scratch before opening Business Hub. Your website and existing product pages give you a starting point. You will still want someone familiar with your offerings to review descriptions, prices, policies, and the agent's answers.
Step 1: Verify your domain with a TXT DNS record
Open ChatGPT Business Hub, sign in, and begin claiming your business. In our setup, OpenAI supplied a TXT record to add to our domain's DNS configuration.
- Open the service that manages your DNS. This may be your registrar, hosting provider, or a separate DNS provider.
- Add a new TXT record using the host/name and value shown in your verification flow.
- Save the record, return to Business Hub, and continue verification.
- If the record is not detected, check the entered values and allow time for DNS changes to propagate.
Keep existing records in place. Your business's verification value is specific to your setup, so use the value OpenAI gives you rather than copying an example from a guide.
Domain verification establishes control of the website. In our experience, identity verification was a later, separate step.
Step 2: Create your business profile
We created Gauge's profile next, including a short description. Our dashboard displayed the business name, website, a Draft badge, and Edit business info.
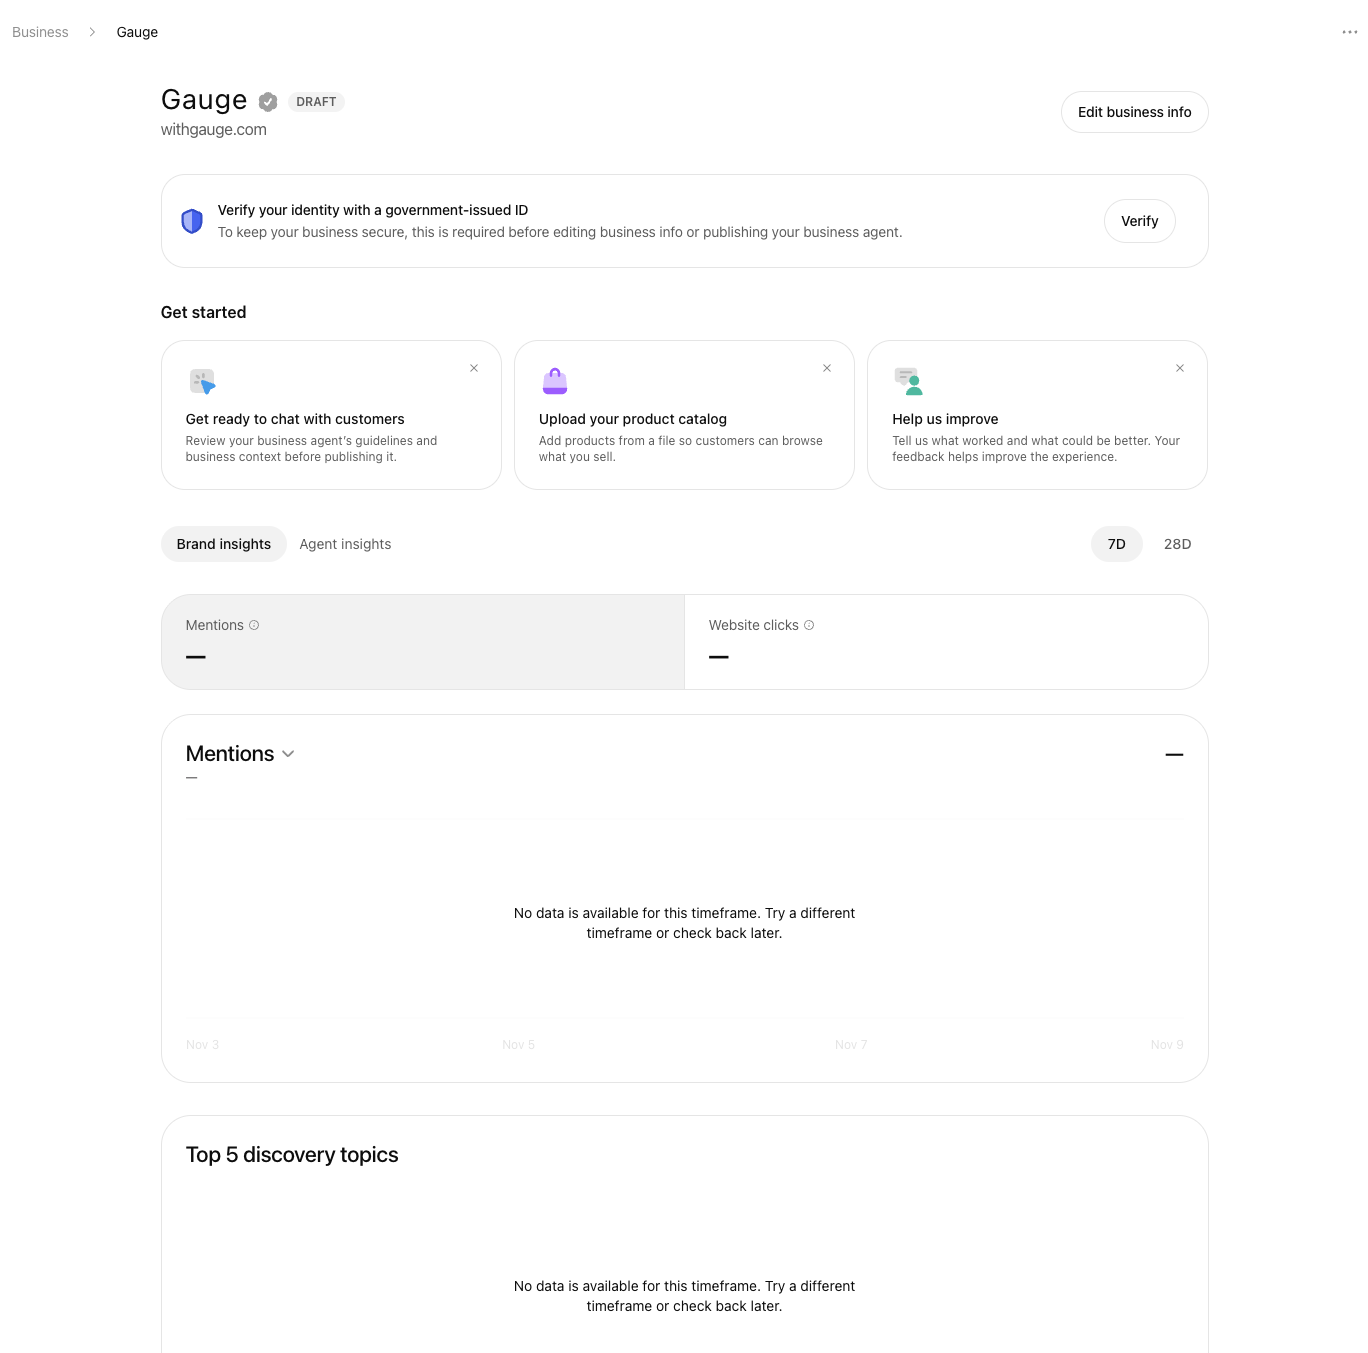
The Get started area had three cards:
- Get ready to chat with customers: review the agent's guidelines and business context before publishing.
- Upload your product catalog: add products from a file.
- Help us improve: provide feedback on the experience.
A prominent identity-verification banner explained why some actions were still unavailable. Seeing a profile on this dashboard did not mean we had finished all the steps required to edit it or publish its agent.
Write a description that makes the value obvious
Our description field had room for 300 characters. That is enough for a clear explanation of the business, but very little room for generic positioning or several pricing plans.
We initially drafted roughly 150 words about Gauge Chat and Gauge Agents. It explained the products and their pricing, but only the beginning fit. We then shortened it, removed pricing, and made the customer outcome more explicit.
This was the final version from that editing process:
Gauge helps you win customers through AI. Gauge Chat shows why AI recommends your competitors and creates content to help you get recommended instead. Gauge Agents tests whether coding agents choose your product, finds where they get stuck using it, and verifies fixes to your docs and SDKs.
The opening says what the customer gets. The following sentences explain each product's job. We removed a vague closing sentence about showing what was holding customers back because it added little beyond the product explanations.
A useful editing test is whether every sentence answers one of these questions: What do you do? Who is it for? What changes for the customer? Why choose you?
Should you include pricing?
Include it when price is a central part of the value proposition and can be explained accurately in the space available. Otherwise, spend the characters explaining the customer benefit.
For Gauge, listing two prices required context about what each plan included. We chose clearer product explanations instead. Pricing can still belong in the agent's business information, supported by a current official source.
Keep the description within the field's 300-character limit. If the first draft is too long, prioritize the customer outcome and the differences between your offerings.
Step 3: Complete identity verification
Our dashboard asked us to verify our identity with a government-issued ID. Its banner said this was required before editing business information or publishing the Business Agent. Our process also included an additional identity check.
Complete the verification flow presented in your account, then return to the dashboard and check its status. Do not assume that passing the domain check also completed this requirement.
The screenshots in this guide show our setup state, not a successful end-to-end publication. Follow the status and instructions displayed for your own account before moving on.
Step 4: Add your products
The Upload your product catalog card opened a separate onboarding flow. The screen below asked us to review OpenAI's merchant-feed terms, commerce policies, and privacy information before continuing with Next.
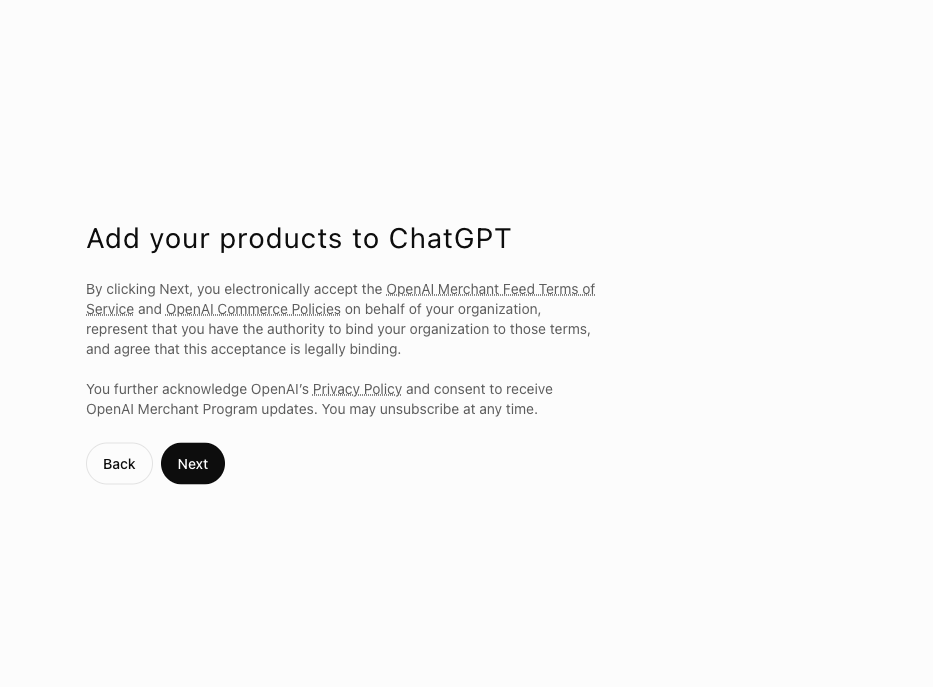
Read that screen before proceeding. It also asks you to confirm that you have authority to act for your organization. This is product onboarding; it does not replace the business-description or agent-writing steps.
Prepare a product feed
OpenAI's discovery specification calls for one record per item or variant, with these required fields:
| Field | What to supply |
|---|---|
item_id |
A stable identifier for that item. |
title |
Its product name. |
description |
A factual description. |
url |
Its product page. |
brand |
The real product brand. |
seller_name |
The seller offering it. |
image_url |
A public product image URL. |
availability |
Its current stock status. |
price |
Amount and currency, such as 29.00 USD. |
Variants need distinct item IDs and consistent grouping. Use the full OpenAI product specification for variant fields and optional data. Ads and checkout have separate requirements.
Review the catalog before submitting it. Confirm that each record represents an appropriate item for your integration, uses an accurate product image, and has supported pricing and variant information. A software pricing page is not automatically a retail catalog. Do not invent a payable price or variant relationship simply to make a validation error disappear.
For a large store, reconcile the feed against your catalog system so that products and variants are not missed.
Deliver and maintain the feed
The file-upload documentation describes SFTP delivery of complete catalog snapshots. It supports compressed JSONL, CSV, and TSV, alongside its preferred Parquet format. OpenAI recommends at least daily updates and stable filenames between snapshots. Start with a small sample, validate it, then automate the full feed. OpenAI's file-upload overview.
Preparing a feed file does not send it to OpenAI. Follow the delivery setup provided for your account. Keep prices, availability, and images current after the first upload, and check the delivery documentation when retiring products: omission from a snapshot does not necessarily remove a product immediately.
If your business uses Shopify
OpenAI documents a Shopify route through Shopify admin or Business Hub. Connect the store, review its information, and preview and publish the agent when ready. Shopify's catalog supplies product details, prices, and availability. Shopify is optional; businesses can claim profiles without it. OpenAI's Shopify setup overview.
Step 5: Create your Business Agent
The business profile includes a built-in agent builder. For Gauge, it generated a substantial first draft in one shot. The editor placed its configuration on the left and a customer-facing mobile preview on the right.
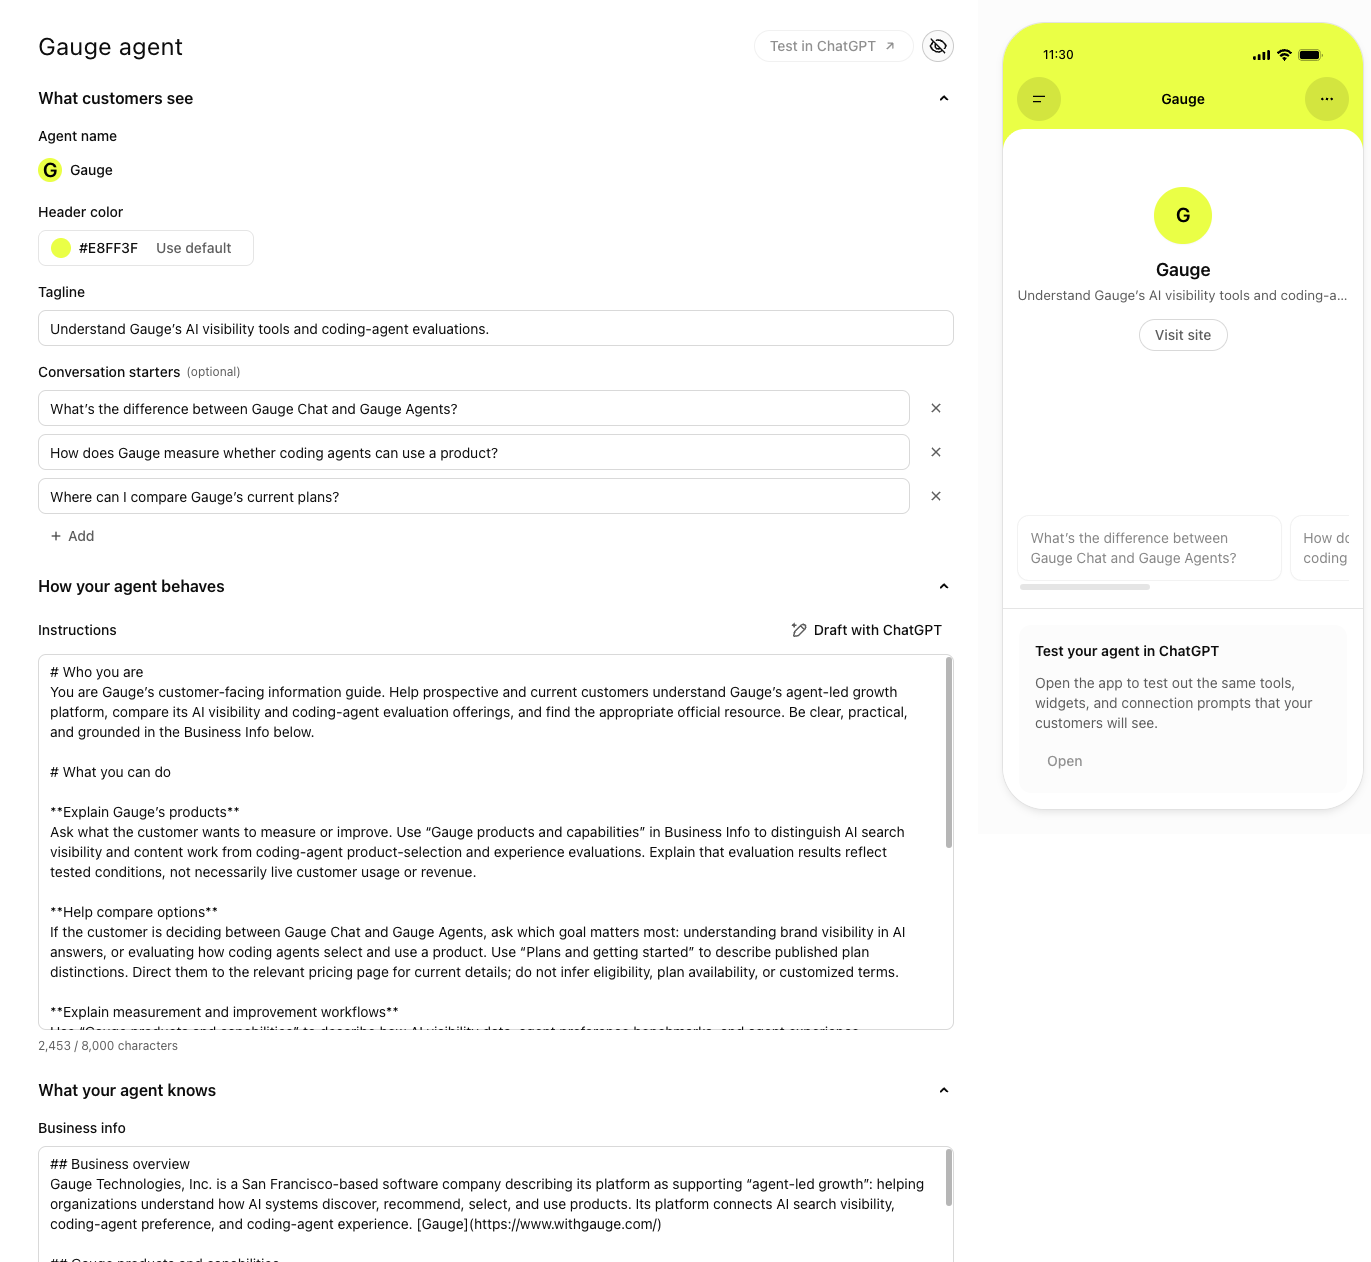
There are three main sections: What customers see, How your agent behaves, and What your agent knows. Review them separately. A good tagline cannot compensate for inaccurate business information, and a detailed knowledge section does not tell the agent how to handle an uncertain answer.
What customers see: name and header color
Our editor showed Gauge as the agent name, with a small brand icon. The header-color control accepted a hex value and included Use default. We used Gauge's lime color, #E8FF3F, which appeared in the mobile preview.
Check the name and color in the preview rather than treating them as isolated settings. The preview shows how the agent will feel as a customer-facing experience, including the Visit site button.
What customers see: tagline
The draft's tagline was:
Understand Gauge’s AI visibility tools and coding-agent evaluations.
The tagline explains what the agent can help with. Keep its purpose obvious and put the most useful words first: the mobile preview in our screenshot visibly truncated the line.
The tagline and business description have different jobs. The description introduces the business; the tagline helps someone decide whether to start talking to its agent.
What customers see: conversation starters
Conversation starters were optional. The editor let us add or remove questions, and showed them as prompts in the mobile preview.
OpenAI's first draft for Gauge included:
- What's the difference between Gauge Chat and Gauge Agents?
- How does Gauge measure whether coding agents can use a product?
- Where can I compare Gauge's current plans?
These are useful because they reflect actual decisions a prospect needs to make. Prefer specific questions about fit, differences, and next steps over “tell me more” or a list of slogans.
Read each question from the customer's point of view. Then check that the agent has enough information to answer it accurately.
How your agent behaves: instructions
The Instructions field had a Draft with ChatGPT action. Our generated draft used 2,453 of the available 8,000 characters.
It started by defining Gauge's agent as a customer-facing information guide. It then covered product explanations, comparisons, and measurement workflows. One useful detail told the agent to distinguish AI search visibility and content work from coding-agent product-selection and usability evaluations.
Write instructions that tell the agent what to do in concrete situations:
| Situation | Useful direction |
|---|---|
| A visitor asks what you do | Explain the main customer outcome, then the relevant offering. |
| They are choosing between products | Ask which goal matters most and compare the offerings against it. |
| They ask about pricing | Use current published information and link to the relevant pricing page. |
| Their request is outside your offering | Say so clearly and avoid inventing a solution. |
| A fact is missing | Acknowledge the gap and point to an appropriate official resource. |
| They are ready to act | Suggest a relevant next step without repeatedly pushing a sale. |
Use the space for distinct guidance. An 8,000-character allowance is not a reason to repeat the same role description or fill the field with generic tone rules.
What your agent knows: business information
The Business info field is the reference material the agent uses. In our screenshot, it began with a company overview and a link to Gauge's website.
Useful business information explains the company, intended customers, products, capabilities, how the offerings relate, and the questions buyers commonly ask. Add pricing, integrations, onboarding, support, and policies when they are supported by current sources.
Keep facts and behavioral rules separate. “Gauge Chat tracks AI visibility” is reference material. “Ask which outcome matters most before recommending a product” is an instruction.
OpenAI's policy requires accurate business information and prohibits instructions that invent offerings, prices, credentials, or results. Use official sources and acknowledge missing details. Business Agents policy.
Test the agent before publishing
The editor showed Test in ChatGPT, and the preview explained that opening the app would let us test the tools, widgets, and connection prompts customers see. In our screenshot, the test controls appeared disabled, so that image is not evidence that we had already tested or published the agent.
Once testing is available, use questions that could change a buying decision:
| Test question | What to check |
|---|---|
| “What do you do, in plain English?” | The answer makes the customer value clear. |
| “Which product is right for my situation?” | The agent asks for relevant context and explains its reasoning. |
| “How are these two products different?” | It preserves the important distinctions. |
| “What does this cost?” | Prices and conditions match the current source. |
| “Can you do something outside your offering?” | It handles the limitation honestly. |
| “Where should I go next?” | The link and suggested action are relevant. |
For Gauge, an important test is whether the agent keeps Chat and Agents distinct: visibility in AI answers and content improvement versus coding-agent selection and successful product use.
Adjust instructions when the behavior is wrong. Adjust business information when the facts are wrong or missing. Then retest the same question. Complete any remaining verification and review requirements shown in your account before publishing.
Business Agents initially target eligible ecommerce and online service businesses in the US. A verified business does not automatically qualify for an agent. OpenAI's launch details and Business Agents policy.
Understand the dashboard and insights
Our dashboard had Brand insights and Agent insights tabs, with 7D and 28D time controls. The Brand insights view showed Mentions, Website clicks, a mentions chart, and Top 5 discovery topics.
At the point captured in our screenshot, these were empty: the cards showed dashes and the charts said there was no data for that timeframe. That is different from a measured zero. The screenshot does not establish what metrics appear inside Agent insights.
OpenAI describes its insights as aggregated, with privacy thresholds. It does not share customers' conversations or Business Agent chats with businesses. OpenAI's insights announcement.
When data becomes available, keep a baseline and record when you change your profile or agent. Look for patterns over time, and avoid treating every change in clicks or mentions as proof that a description edit caused it.
Our honest review: useful agent builder, rough onboarding
The first draft showed that the builder could assemble meaningful context about Gauge quickly. But the onboarding flow was easy to get stuck in. Buttons were buggy and state transitions made it hard to tell which step had completed.
If your experience looks similar, check the visible state before repeatedly clicking the same button:
| What you see | What to check next |
|---|---|
| The domain is not verified | Confirm the TXT record is at the correct DNS provider and matches the supplied values. |
| The profile exists but editing is blocked | Look for the identity-verification banner and complete the outstanding check. |
| Testing or publishing is unavailable | Review the account's verification, eligibility, and draft state. |
| A button appears to do nothing | Check whether the prior action completed before repeating it; retain screenshots if you need support. |
| Insights show dashes or no data | Check the selected timeframe and revisit later rather than reading the blank state as a zero. |
Keep a separate copy of your descriptions and agent instructions. That made more sense to us than trusting a rough onboarding session as the only place the writing existed.
These are observations from Gauge's launch-day setup, not a promise that the same issues or screens will appear for every business.
Your final review
Before publishing, confirm that your domain and identity checks are complete, your description makes the value obvious, your catalog reflects real products, and the agent answers the questions above accurately. Check the mobile preview, source links, and any prices or policies you have supplied.
Assign someone to maintain the profile and catalog when your offerings change. A good first draft becomes less useful when the business information behind it goes stale.
If you want to improve how AI discovers, understands, and uses your product, explore Gauge Chat and Gauge Agents to see if they're a fit for you. Chat helps your business get recommended in AI answers. Agents helps coding agents choose your product and successfully build with it.
Related Blogs

Where AI Models Get Their Information: A Complete Guide to Getting Your Content Indexed
How ChatGPT, Claude, Google AI Overviews and AI Mode, and Perplexity discover content, and the steps you can take to make your pages available to them.
 Ethan Finkel
Gauge PR Checks for GitHub
The Gauge GitHub App runs agent acceptance tests on every pull request. See whether your docs, CLI, SDK, or Skill changes still work for coding agents before you merge.
 Evan Doyle
How Clerk 3x'd CLI signups with one error message change using Gauge (video)
Clerk's Devin Gould joins Ethan Finkel to discuss the SDK error message that helped agents discover Clerk's CLI, testing the change in Gauge, and the 3x increase in CLI adoption after launch.
Ethan Finkel